In the previous blog post (COLOR SEGMENTATION), it was shown that thresholding and color can be used to segment a region of interest within an image. Also, as demonstrated previously, overlaps in graylevel values (thresholding) or chromaticities (color segmentation) sometimes lead to the inclusion of unwanted artifacts into the segmented images. Is there any solution we can implement to alleviate this problem?
It turns out, there is! An answer lies with the use of morphological operations. By definition, morphological operations are a set of nonlinear operations that alter the shape of regions in an image [2]. The operations work off the basis of set theory (union, intersection, etc) where the "sets" being considered are collections of pixels. Now it is important to remember that morphological operations rely on the relative ordering of pixel values and thus is well suited to handle binary images. How exactly do we do this in a controlled and deterministic way? An intuitive graphical approach to understanding morphological operations is explained in Reference [2] and as such, will be the basis of many explanations made throughout this blog.
A morphological operation is performed between an image and a so-called structuring element. This structuring element provides control over how the morphology of features in an image are to be changed. A structuring element is basically just a small matrix consisting of 0's and 1's whose size, shape, and origin determine its effect on a test image upon applying a morphological operation. How exactly these structuring elements are used in morphological operations is dependent on the operation itself and thus will be discussed later.
Two basic morphological operations vastly used in image processing are the operations of erosion and dilation. So without further adieu, let's dive in!
EROSION AND DILATION
We can infer from the names of these two operations that erosion refers to a process that reduces the sizes of features while dilation refers to a process that increases the sizes of features within an image. This is performed through the use of a structural element and set theory. From [1], erosion of a set of pixels A by a structuring element B results in a reduced version of A wherein the reduction is performed in the shape of B. Dilation of A by B, on the other hand, results in an expanded version of A wherein the expansion is performed in the shape of B. Reference [2] has a rather nice "hit" and "fit" model to explain the operations of erosion and dilation.
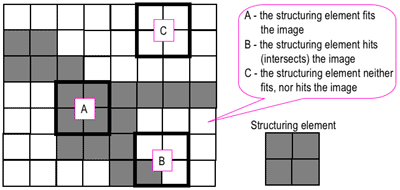 |
| Figure 1. "Hit" and "fit" model to explain erosion and dilation [2]. |
Just for this explanation, let us set the dark portions as having a binary value of 1 while the light portions as having a binary value of 0. As shown in Figure 1, we consider a 2 by 2 structuring element (right) and a test image (left). The erosion and dilation operations involve positioning the structuring element (using its "origin") at each pixel of the test image and testing whether the structuring elements "hits", "fits", or neither "hits" or "fits" the local neighborhood of pixels. The "fit" test is successful if the pixel values of the structuring element all match those of the neighborhood of pixels over which it is overlain. The "hit" test is successful if at least one match is found. If either test is "successful" then, in a new array of the same size, the corresponding pixel position at which the structuring element's origin is currently at is given a value of 1. Otherwise, it is given a value of 0.
These two tests are simply the geometrical explanations used to implement the following set theory defintions of erosion and dilation. We have,
 where the first equation is for erosion and the second equation is for dilation. Here, A is the test image and B is the structuring element. The subscript z signifies a translation of B by the vector z (equivalent to "moving" the structuring element to each cell of A). Note that the dilation operation requires that we reflect the structuring element about its origin before applying the "hit" test!
Subsequently, the operation of erosion employs the "fit" test while the operation of dilation employs the "hit" test (with the added reflection!). Before doing any programming, we can actually try to predict the results using some sample test shapes, structuring elements, and the "hit"/"fit" tests described previously. The results are shown in Figures 2 and 3.
As shown, we see that the erosion procedure alters the shape of the features in such a way that their sizes are decreased while the opposite (sizes are increased) occurs for dilation. Before pointing out additional observations, however, we can verify these hand drawn results with those generated from a computer program. The Scilab program implemented makes use of the very useful IPD toolbox developed by Harald Galda [4]. Most of the main functions used in this blog come from this module. Sample code for the dilation of a 5 by 5 square with a 2 by 2 structuring element is shown below in Figure 4.
Lines 1 and 2 handle the generation of the 5 by 5 square with padding on all sides. This padding is placed just to aid in viewing as the problem of "border pixels" introducing unwanted artifacts is accounted for in the DilateImage() and ErodeImage() functions [3]. Line 4 accounts for the creation of the structure element. Note that the origin of the structure element is set by default. Lastly, the result of the dilation/erosion procedure is performed in line 5.
The results of these programs are now shown in Figures 5 and 6.
First off, we see that shape-wise and size-wise, the results in Figure 2 and 3 are consistent with those in Figures 5 and 6, respectively. If there are any differences, we see that it is in the choice of pixel membership. For example, considering the result in row 1 and column 1 of Figure 2 and 5, we see that in Figure 2, the upper right corner set of pixels are eroded while the upper left corner set of pixels are eroded in the result in Figure 5. This is attributable to a difference in the choice of the origin of the structuring element. Although the choice of the origin of the structuring element may affect the output by changing which pixels are given membership in the final output (and thus the "position" of the final image), the two results are still exactly the same when compared in terms of their morphology (and this is what we're trying to alter anyway!). (EDIT: This, however, did not seem to be true for dilation especially when the structuring elements used are not symmetric). Moreover, because the Scilab functions used have no mention of a specific origin used, slight deviations between drawn and computer generated results exist.
Taking a look at the results, it is rather difficult to come up with some general rule and gain full intuition on predicting the outcomes of both the erosion and dilation procedures. For relatively "simple" structuring elements such as the 2 by 2 square, the column, and the row, we see that erosion/dilation procedures result in the removal/addition of pixels in the "preferred orientations" of the structuring elements. For example, erosion/dilation with the 2 by 2 square results in a reduction/addition of equal amounts of pixels along both the horizontal (let's call this the x-direction) and vertical (and this the y-direction). Correspondingly, erosion/dilation with the column and row structuring elements results in a reduction/addition of equal amounts of pixels along the vertical and horizontal directions, respectively. Additionally, notice how the reduction/addition is performed such that the shape of the test feature is patterned after that of the structuring element's. Although this general reduction/increase of pixels in the "preferred orientations" of the structuring element used is still somewhat observed for the generated results using the plus and diagonal structuring elements, the shapes and sizes of the original features are drastically changed. It is thus obvious that there are additional factors influencing our outputs!
Absent from the above discussion is any mention of the sizes of the structuring elements used. It is important to remember that not only the shapes of the structuring elements matter, but also their sizes relative to the sizes of the features. This point is demonstrated by the blank result in row 5 column 1 of Figure 5. Due to the the structuring element used being of comparable size with respect to the features being analyzed, the original morphological characteristics of the features are vastly changed. This factor is particularly important when we implement the closing, opening, and tophat operators as will be discussed later.
For more complicated shapes and structuring element combinations, it appears to be almost impossible to predict (at a glance) the effects of the erosion and dilation features. This fact is especially applicable for the dilation operation (as it requires a reflection) when using a structuring element that is not symmetric as it requires some "imagination" to predict the result in an instant.
Thus, choice of each of the characteristics of the structuring elements completely depends on the test image used and one's objective.
To fully push the point home for this section, I've made a GIF illustrating the erosion operation acting upon a test image. (Can you do the same for the dilation operator?) Note that the elements that are to be changed are changed only after the fit test is applied to ALL cells.
These two tests are simply the geometrical explanations used to implement the following set theory defintions of erosion and dilation. We have,

Subsequently, the operation of erosion employs the "fit" test while the operation of dilation employs the "hit" test (with the added reflection!). Before doing any programming, we can actually try to predict the results using some sample test shapes, structuring elements, and the "hit"/"fit" tests described previously. The results are shown in Figures 2 and 3.
 |
| Figure 2. Predicted results of the erosion procedure using a test shape (leftmost column) and a corresponding structuring element (topmost row). The shaded boxes are those that were removed from the original shape as a result of the procedure. The new shape is outlined in solid black. |
 |
| Figure 3. Predicted results of the dilation procedure using a test shape (leftmost column and a corresponding structuring element (topmost row). The shaded boxes are those that were added to the original shape as a result of the procedure. The new shape is outlined is solid black. |
As shown, we see that the erosion procedure alters the shape of the features in such a way that their sizes are decreased while the opposite (sizes are increased) occurs for dilation. Before pointing out additional observations, however, we can verify these hand drawn results with those generated from a computer program. The Scilab program implemented makes use of the very useful IPD toolbox developed by Harald Galda [4]. Most of the main functions used in this blog come from this module. Sample code for the dilation of a 5 by 5 square with a 2 by 2 structuring element is shown below in Figure 4.
1 2 3 4 5 | square5=zeros(9,9) square5(3:7,3:7)=1 SE1=CreateStructureElement('custom',[%t %t; %t %t]) Result11=DilateImage(square5,SE1) |
Figure 4. Sample code used
Lines 1 and 2 handle the generation of the 5 by 5 square with padding on all sides. This padding is placed just to aid in viewing as the problem of "border pixels" introducing unwanted artifacts is accounted for in the DilateImage() and ErodeImage() functions [3]. Line 4 accounts for the creation of the structure element. Note that the origin of the structure element is set by default. Lastly, the result of the dilation/erosion procedure is performed in line 5.
The results of these programs are now shown in Figures 5 and 6.
 |
| Figure 5. Computer generated results of the same test shapes and structuring elements used in Figure 3 for the erosion procedure. |
 |
| Figure 6. Computer generated results of the same test shapes and structuring elements used in Figure 3 for the dilation procedure. |
First off, we see that shape-wise and size-wise, the results in Figure 2 and 3 are consistent with those in Figures 5 and 6, respectively. If there are any differences, we see that it is in the choice of pixel membership. For example, considering the result in row 1 and column 1 of Figure 2 and 5, we see that in Figure 2, the upper right corner set of pixels are eroded while the upper left corner set of pixels are eroded in the result in Figure 5. This is attributable to a difference in the choice of the origin of the structuring element. Although the choice of the origin of the structuring element may affect the output by changing which pixels are given membership in the final output (and thus the "position" of the final image), the two results are still exactly the same when compared in terms of their morphology (and this is what we're trying to alter anyway!). (EDIT: This, however, did not seem to be true for dilation especially when the structuring elements used are not symmetric). Moreover, because the Scilab functions used have no mention of a specific origin used, slight deviations between drawn and computer generated results exist.
Taking a look at the results, it is rather difficult to come up with some general rule and gain full intuition on predicting the outcomes of both the erosion and dilation procedures. For relatively "simple" structuring elements such as the 2 by 2 square, the column, and the row, we see that erosion/dilation procedures result in the removal/addition of pixels in the "preferred orientations" of the structuring elements. For example, erosion/dilation with the 2 by 2 square results in a reduction/addition of equal amounts of pixels along both the horizontal (let's call this the x-direction) and vertical (and this the y-direction). Correspondingly, erosion/dilation with the column and row structuring elements results in a reduction/addition of equal amounts of pixels along the vertical and horizontal directions, respectively. Additionally, notice how the reduction/addition is performed such that the shape of the test feature is patterned after that of the structuring element's. Although this general reduction/increase of pixels in the "preferred orientations" of the structuring element used is still somewhat observed for the generated results using the plus and diagonal structuring elements, the shapes and sizes of the original features are drastically changed. It is thus obvious that there are additional factors influencing our outputs!
Absent from the above discussion is any mention of the sizes of the structuring elements used. It is important to remember that not only the shapes of the structuring elements matter, but also their sizes relative to the sizes of the features. This point is demonstrated by the blank result in row 5 column 1 of Figure 5. Due to the the structuring element used being of comparable size with respect to the features being analyzed, the original morphological characteristics of the features are vastly changed. This factor is particularly important when we implement the closing, opening, and tophat operators as will be discussed later.
For more complicated shapes and structuring element combinations, it appears to be almost impossible to predict (at a glance) the effects of the erosion and dilation features. This fact is especially applicable for the dilation operation (as it requires a reflection) when using a structuring element that is not symmetric as it requires some "imagination" to predict the result in an instant.
Thus, choice of each of the characteristics of the structuring elements completely depends on the test image used and one's objective.
To fully push the point home for this section, I've made a GIF illustrating the erosion operation acting upon a test image. (Can you do the same for the dilation operator?) Note that the elements that are to be changed are changed only after the fit test is applied to ALL cells.
 |
| Figure 7. "Real-time" implementation of the erosion operation on a test image (left) using a 2 by 2 square structuring element (right). The squares in grey refer to 0 values while the squares in white refer to white values. |
CLOSING, OPENING, AND TOPHAT
Well that's done. As shown previously, both the erosion operators can drastically change the morphology and size of features within a test image. Moreover, notice how erosion and dilation have opposite effects. The word "opposite" is used in the sense that erosion results in a shrinking of features while dilation results in a enlargement of features. This, however, does not mean that we can revert a dilation operation by applying an erosion operation or vice-versa (In most cases, we can't!). This is due to the fact that we must take into account the effect of the size, shape, and symmetry of the structuring element used for both operations. Mathematically, erosion and dilation are termed as dual operators (See [2] for more details).
What this tells us is that an erosion followed by a dilation generally does not yield the same result as a dilation followed by an erosion.It just so happens that this pair of operations lead to the definition of two operations: closing (dilation followed by an erosion), and opening (erosion followed by a dilation). As their names suggests, the closing operator can fill in holes within the image while the opening operator can open up gaps between features connected by thin bridges of pixels. What's more important is the fact that for both operations, the size of the some features within the image before and after application of the operation remain the same! This is of course dependent on the structuring element used in the operation. Fortunately for us, the closing and opening operations can be performed using Harald Galda's built-in functions CloseImage() and OpenImage().
Let us consider the test image in Figure 8a and the resulting outputs of applying the opening operation with varying cubic structuring elements in Figures 8b , 8c, 8d, and 8e. The test image used contains circles of varying sizes connected by "pixel bridges" of increasing thickness from left to right.
 |
| Figure 8. Shown are the (a) test image, and the opening operation results using cubic structuring elements of sizes (b) 3 by 3, (c) 5 by 5, (d) 6 by 6, and (e) 8 by 8. |
Moving on to the closing operation, let us consider the test image of a circle with "spotting" in Figure 9a. We apply the closing operation using varying sizes of structuring elements to obtain the results in Figures 9b to 9d.
 |
| Figure 9. Shown are the (a) test image, and the closing operation results using cubic structuring elements of sizes (b) 8 by 8, (c) 15 by 15, (d) 20 by 20. |
Let's say, on the other hand, that for some reason, we want to obtain those elements that were removed after an opening operation. To do this, we simply take the difference between the opening results and the original image! This leads us to the top hat operators which come in two variants: the white top hat operator and the black top hat operator (The black top hat operator is more interesting when applied to gray scale images and thus will not be discussed in this context.). The white top hat operator is defined as the difference between the original image and the "opened" image [5]. Using the test images in Figure 8 and 9, we can test the effect of these operators. The results are shown in Figure 10.
 |
| Figure 10. Shown are the (a) test image and (b) result of the white top hat operation using a circular structuring element of radius 8. |
Now that we have more than a working feel of the some simple morphological operations, it's time to apply what we've learned to a "real world" scenario.
THE ODD ONE OUT
Let's consider the scenario of trying to find the mean size of a human cell from an image in the hopes of using this mean size to analyze other similarly scaled images and reject cells that are abnormally larger. We simulate this setup by using an image of punched out circular pieces of paper as shown in Figure 11.
 |
| Figure 11. Punched out circular pieces of paper meant to simulate a swatch of human cells |
Our goal is to obtain the area of each circular paper (by counting pixels) and use statistics to find the mean value and standard deviation. As such, the first step would be to threshold the image. Let's take a look at the histogram plot (see my previous blog on COLOR SEGMENTATION on how to do this!) of the image in Figure 11.
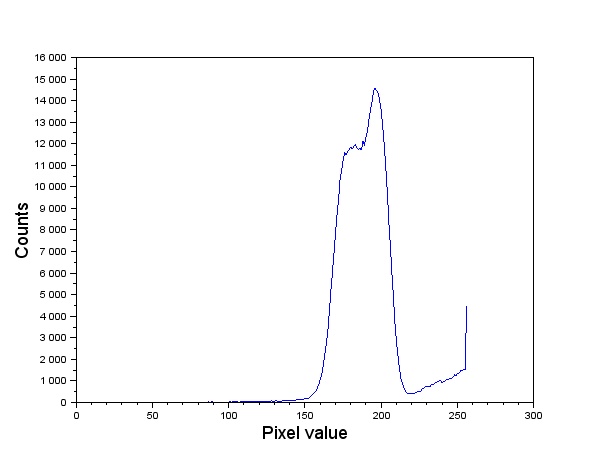 |
| Figure 12. Gray scale histogram of the image in Figure 11. |
 |
| Figure 13. Binarized form of Figure 12 cut up into twelve 256 by 256 images. Note that an overlap between cut out images was ensured. |
1 2 3 4 5 6 | pic=imread('C:\Users\Harold Co\Desktop\Applied Physics 186\Activity 8\Attachments_2016117 (1)\circles\7.png') binarized=SegmentByThreshold(pic,220) marker_image=SearchBlobs(binarized) numberblobs=double(max(marker_image)) ShowImage(marker_image,'Result',jetcolormap(numberblobs)) |
Figure 14. Code used to search for "blobs" in a binarized image.
Note that numberblobs is the number of blobs detected in the subimage chosen. The jetcolormap() function was used to color code the various detected blobs in the subimage. The results are shown in Figure 15.  |
| Figure 15. Shown are the (a) subimage, and (b) result after the SearchBlobs() procedure. |
(At this point, Scilab has failed my once again and started malfunctioning on my PC again. Switched to MATLAB instead! The complete code for the processing of one of the subimages within MATLAB will be shown.)
First notice that there are "holes" in the several of the blobs that need to be closed up. This is to ensure that we get a more accurate value for our area calculation later. It makes sense therefore to apply the closing operator with a circular structuring element (because the blobs are roughly circular) of a size slightly bigger than the gaps we want to fill. Thus, we use a circular structuring element with a radius of 5. Additionally, to remove any small isolated artifacts left out by the thresholding procedure and the cutting of the subimage, an opening operation is performed using a circular structuring element of radius 1. The results are shown in Figure 16.
 |
| Figure 16. Before and after of the closing procedure with a circular structuring element of radius 5 and opening procedure with a circular structuring element of radius 1. |
1 2 3 4 5 6 7 | original=imread('7_binarized.png'); imshow(original); se1=strel('disk',5); se2=strel('disk',1);
closed_image=imclose(original,se1);
closed_image=imopen(closed_image,se2);
imshow(closed_image)
imwrite(closed_image,'7_binarized_closed.png');
|
Figure 17. MATLAB code used to apply morphological closing to an image
Although the gaps in the image were effectively closed, another problem has popped up. Because there are overlapping objects in the original image, the closing procedure effectively combined close enough blobs into consolidated blobs. Thus, if the counting procedure is employed, it would be as if there existed larger than normal cells and fewer cells than there actually are. Thus, we must find some way to reopen the gap between these cells.
A possible answer lies in the watershed algorithm. This algorithm requires that we think of the gray scale intensity image as a topographical map with positive pixel values representing elevation and negative values representing depth. These "low regions" are termed "catchment basins" and are separated form other "catchment basins" by a watershed line. Without going into too much detail, the algorithm is able to separate overlapping catchment basins given their "seed points" (pixel position of the deepest point). For more explanation, you might want to check reference [6]. Anyway, the implementation performed in shown in Figure 18.
1 2 3 4 5 | D=-bwdist(~closed_image); I3=imhmin(D,0.189); L=watershed(I3); closed_image(L==0)=0; imshow(closed_image); |
Figure 18. MATLAB code used to separate connected blobs
The MATLAB watershed() function requires that it is passed an image wherein each object of interest is represented by a unique catchment basin. We can turn the objects in a binary image into catchment basins by using the distance transform. For each pixel in an image, the distance transform assigns a number that is equal to the distance of that pixel to the nearest non-zero valued pixel. In MATLAB, this function is bwdist(). If we go ahead and use bwdist() on closed_image, we still wouldn't have separate catchment basins for each individual object because the distance transform of the overlapping white region will yield a constant black region (think about it!). Instead, we take the distance transform of it's compliment and then take the negative of this (because our "catchment basins" are the white regions). Passing this to the watershed() function yields a label matrix L containing the separated catchment basins areas each labeled with a unique index. We can use where the label matrix equals zero (no catchment basin) to thus segment the original image. Note that the imhmin() is used to suppress minima in the intensity image less than a certain threshold. This is to prevent oversegmentation and to provide more control over the watershed procedure. For the closed image in Figure 16, we obtain the watershed segmented image in Figure 19.
 |
| Figure 19. Before and after of the watershed procedure using an imhmin() threshold of 0.189. |
Now that's all done, it's finally time to count blobs! We use the MATLAB function bwlabel() to label each connected region of pixels with a unique label. For each label (and thus each "cell"), we can find the area. We can then find the mean and standard deviation of the areas of the cells present within the subimage chosen. This is implemented in the MATLAB code in Figure 20 using the closed_image output from the code in Figure 18.
1 2 3 4 5 6 7 | conn=bwlabel(closed_image); blobarea_list=zeros(1,max(conn(:))); for i=1:max(conn(:)) blobarea=size(find(conn==i),1); blobarea_list(1,i)=blobarea; end |
Figure 20. Measurement of the area of each detected "cell" in the subimage.
Now, that we've developed a suitable method, all we have to do is apply the same algorithm to all the other subimages! Note, however, that that we have three parameters that we can vary: the size of the structuring element for the opening and closing operation, and the threshold for the watershed algorithm. Shown in Figure 21 are the results of applying the outlined procedure to each subimage and the parameters used for each subimage. As expected, the parameters used greatly varies from subimage to subimage.
 |
| Figure 21. Results after applying the outlined procedure to each subimage in Figure 13. The parameters used (size of structuring elements for the closing/opening operations and the threshold for the watershed algorithm) are also shown. |
We can portray all of the areas measured using a histogram as shown in Figure 22.
 |
| Figure 22. Shown is a histogram of the measured cell areas |
Now that we FINALLY have a "standard" cell size to use, let's try using this value to find abnormally large "cells" in another test image. Consider the test image shown in Figure 23.
 |
| Figure 23. Test image containing a mix of "cells" of different sizes. |
 |
| Figure 24. Histogram of the test image in Figure 23 |
 |
| Figure 25. Output of applying thresholding on the test image in Figure 23 using a threshold of 213. |
 |
| Figure 26. Shown are the filtered out "cancer" cells (left) and the identification of these cells in the original test image (right) |
FINALLY I'm done. Crazy long blog post (26 figuressss) which took me more than a week to finish! I do admit that I initially was not as excited to delve into this topic as compared to the other topics, but after powering through, I realized how many minute points of analysis I could bring up. Studying the erosion and dilation outputs really helped me get an strong intuitive feel of these morphological operations to the point that I was able to apply them (without too much trial and error) to a "real world" scenario. A big plus was also learning the useful watershed algorithm along with the distance transform! Because of all of this, I'd give myself a 12/10.
Acknowledgements:
I'd like to acknowledge Bart's blog for giving me the idea to display the erosion and dilation outputs in a grid format for better understanding. I'd also like to credit Carlo Solibet's blog on giving me the idea to use the opening operator to filter out "normal" sized cells. This greatly sped up the process.
References:
[1] 1. M. Soriano, “Morphological Operations,” 2014.
[2] (n.d.). Morphological Image Processing. Retrieved November 07, 2016, from https://www.cs.auckland.ac.nz/courses/compsci773s1c/lectures/ImageProcessing-html/topic4.htm
[3] Documentation. (n.d.). Retrieved November 07, 2016, from https://www.mathworks.com/help/images/morphological-dilation-and-erosion.html
[4] Scilab Module : Image Processing Design Toolbox. (n.d.). Retrieved November 08, 2016, from https://atoms.scilab.org/toolboxes/IPD/8.3.1
[5] GpuArray. (n.d.). Retrieved November 22, 2016, from https://www.mathworks.com/help/images/ref/imtophat.html
[6] The Watershed Transform: Strategies for Image Segmentation. (n.d.). Retrieved December 04, 2016, from https://www.mathworks.com/company/newsletters/articles/the-watershed-transform-strategies-for-image-segmentation.html
No comments:
Post a Comment